DIY – Snuffle Mat

With winter in full swing, sometimes the weather is not cooperative for outdoor activities for our best furry friend (BFF). So, it’s time to put on the thinking cap and figure out some fun ways to keep the dogs occupied mentally and physically.
Snuffle mats, named after the sound a dog’s nose makes while sniffing, are an excellent choice to flex your DIY-skills and provide your pup with some indoor mental and physical exercise. These easy-to-make food-stuffed toys encourage your BFF to burn some energy while using their nose to find their meal or delicious snacks.
Snuffle mats are easy to make but a bit time intensive. So, grab your supplies, and stream a good movie on TV before you sit down to work on your project.
 SUPPLIES
 SUPPLIES
You will need:
- A rubber mat with holes in it.
- See Notes below to learn more.
- Cut to the size of your choice.·
- Sharp scissors
- 1 to 1 1½ yards of fleece fabric.
- See Notes below to learn more.
NOTES
 Matt Selection
 Matt Selection
When selecting your base mat, if you have a bigger dog or one that will pick up the mat, look at using a heavier mat as your base, such as a rubber anti-fatigue mat. For a smaller dog or toy breed, consider a small, light plastic sink grid.
If you need to make a mat smaller, cut it down!
For our project, we had started with a 24” X 16” rubber anti-fatigue mat and cut it in half to 12” X 16” rubber anti-fatigue mat for a large dog. Of course, the larger the mat, the more material you’ll need, and the longer the project will take.
Fleece Fabric Notes
Fleece fabric comes in many weights and price ranges. We went for thinner material so it would be easier to knot, and we did our shopping from the remnant, half-priced bin at the craft store.
To make it easier to see what direction you’re working in, try using at least two different colors of fleece.

STRIP PREPARATION
- Cut the fleece into strips.
- 6-7” long.
- The width of the material will be based upon the mat you selected.
- We cut it into 1” – 1 ½” width.
- A strip is needed for each bar of your grid, both horizontally and vertically.
- We had 160 of one color and 165 of another color.
- Your cuts do NOT need to be perfect.
START WORKING ON THE MAT

ROW BY ROW
You’re going to feed the fleece through one hole and loop it through the second so that you can flip the mat over and tie it.
- Start at the top left.
- Choose one color of fleece strips.
- Take a strip of fleece and push one end through the first hole of the first row and the other through the second.
- Take another strip of fleece and put through the hole next to the first one and push the other end through the adjacent hole.
- Continue pushing fleece strips through until you finish feeding the first row on the mat
- Flip the mat over and tie the row of strips.
- Your first row is complete!
- Now, flip the mat over and repeat the process until all horizontal rows are filled.

Round Two
Once you have all the horizontal rows filled:
- Turn the 90 degrees.
- Choose another color of fleece strips.
- Start the process over row by row until all the holes in the matt have been filled.
Last Step
When you have all the holes filled:
- Flip the matt over so you see the back.
- Check to make sure there are no loose strips or empty holes.
- Repair as needed.
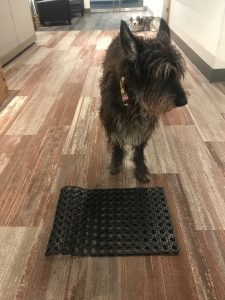
Add the dog!
 At the bakery, we have a variety of dogs working with us. Some are easy to please. If you say “Cookie,” they’ll try anything and are happy to do it. We also have others that are a bit more hesitant. You have to prove to them that the payoff is worthwhile. We chose one of the latter to try it out, Sparky.
With the Sparky watching, we placed the matt on the floor and let him inspect it. He came up to it and examined it thoroughly.
We then had Sparky do a sit-stay next to the matt while we sprinkled treats over it. We told him “OK” to release him from his stay and let him find the treats. It took him a few moments for him to understand it was OK to snuffle through the matt and eat the treats. We used lots of verbal praise for this.
We let Sparky work the mat a couple of times over a day in super-short bursts with some high value treats so he would associate the mat with “find food.”
 The next day, when Sparky saw the mat, he immediately laid down and was “waiting” for us to load the mat. This time, we didn’t sprinkle the treats on the mat. We hid more small treats in the mat, and we pushed them in there so he would have to “work” for it. He was super happy to start working through the mat for his treats. If we wanted to take it up another level, we could use this to feed Sparky his meals.
Happy to say, this was such a success that some of the other office dogs wanted to bust in on his fun.
AS ALWAYS – Dogs MUST be supervised at all times while using this toy and never left alone with it.